Job searching gets messy fast:
- You apply to “a few” roles… then it’s 20… then 80.
- You tailor your resume… but forget which version you used for which company.
- You think you followed up… until you realize you never did.
A spreadsheet won’t magically fix a tough job market—but it will fix the chaos. And the chaos is costly.
The U.S. Bureau of Labor Statistics (BLS) analyzed job search behavior and found that it took jobseekers about six applications to obtain one job offer on average (based on CPS data). Even if your personal ratio is very different, the takeaway is the same: a job search can involve enough applications that you need a system to stay organized.
Source: BLS, Beyond the Numbers — https://www.bls.gov/opub/btn/volume-9/how-do-jobseekers-search-for-jobs.htm (Confidence: High — primary government source)
In this guide, you’ll learn:
- How to build job tracking in Excel step by step (from blank workbook → working tracker)
- The exact columns to use (and which ones are optional)
- How to add drop-down statuses (so your data stays clean)
- How to create follow-up reminders that practically run your job search
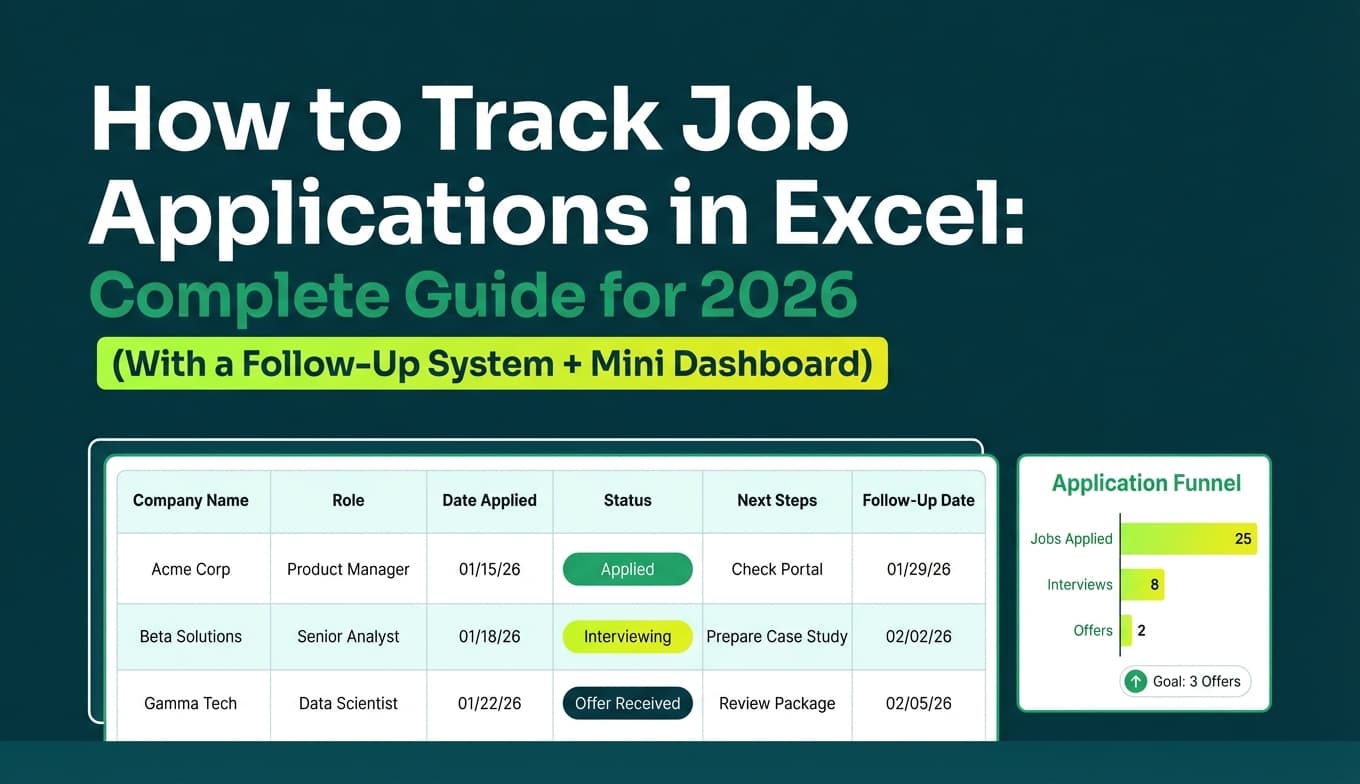
- How to build a simple dashboard (applications, interviews, response rate)
- Common mistakes (and fixes)
- When it’s time to go beyond Excel (and a tool that can still export to Excel)
What is job tracking in Excel?
Job tracking in Excel is a method of managing your job search with a spreadsheet so you can log:
- job applications
- follow-ups
- interviews
- outcomes (rejection, offer, acceptance)
- notes and resume versions
Instead of “checking your inbox and hoping you remember,” you get a single source of truth.
Why job tracking matters in 2026 (with data)
1) Even “average” job searches can require lots of applications
BLS found it took jobseekers ~6 applications per job offer on average. If you’re doing tailored applications (recommended), the memory burden alone is reason enough to track.
Source: BLS — https://www.bls.gov/opub/btn/volume-9/how-do-jobseekers-search-for-jobs.htm (High)
2) The market shifts—so you need to measure what works
BLS JOLTS reported 8.1 million job openings on the last business day of April 2024. Openings go up and down; your strategy should too. A tracker helps you spot patterns like “referrals → interviews” and “cold apply → silence.”
Source: BLS JOLTS (April 2024) — https://www.bls.gov/news.release/archives/jolts_06042024.pdf (High)
3) Hiring teams skim fast—so you need to respond and follow up with context
The Ladders’ updated eye-tracking research is widely cited for showing recruiters spend about 7.4 seconds on an initial resume skim. That makes speed + clarity + follow-through more important—and your tracker is what prevents you from dropping the ball after you apply.
Sources: The Ladders PDF — https://www.theladders.com/static/images/basicSite/pdfs/TheLadders-EyeTracking-StudyC2.pdf and HR Dive summary — https://www.hrdive.com/news/eye-tracking-study-shows-recruiters-look-at-resumes-for-7-seconds/541582/ (Confidence: Medium–High — original PDF + reputable trade publication)
4) Follow-up timing is a real variable (and easy to forget without tracking)
CNBC reported that 36% of respondents said the best time to follow up is one to two weeks after submitting a resume. A tracker turns that into an automatic workflow instead of a mental note.
Source: CNBC — https://www.cnbc.com/2017/10/18/this-is-how-long-you-should-wait-to-follow-up-after-applying-for-a-job.html (Confidence: Medium — media report of survey results)
5) Job seekers have a tolerance limit for application time
HR Dive reported on survey findings from Employ Inc. that 71% of job seekers think the application process should take less than 30 minutes—and long, repetitive processes increase drop-off. That’s another reason to build a tracker that reduces rework (saving job links, resume versions, contact names, etc.).
Source: HR Dive — https://www.hrdive.com/news/job-application-process-should-take-less-than-30-minutes/747352/ (Confidence: Medium — survey reporting via reputable HR publication)
How to do job tracking in Excel step by step (build it in under 60 minutes)
Step 1: Create a new workbook with the right structure
Create a workbook named something like:
Job Search Tracker - 2026.xlsx
Add these sheets (tabs):
- Applications (main tracker)
- Lists (drop-down values to prevent typos)
- Dashboard (PivotTables + KPIs)
- (Optional) Contacts (if you network heavily)
This structure beats most “single-sheet” templates because it stays clean as your tracker grows.
Step 2: Add your tracker columns (copy/paste template)
In Applications, paste these headers in Row 1.
A) Core columns (recommended for everyone)
Date AddedCompanyJob TitleLocationWork Mode(Remote/Hybrid/On-site)Job URLSource(LinkedIn, referral, company site, recruiter, etc.)StatusDate AppliedNext Follow-Up DateLast Contact DateContact NameContact EmailNotes
B) High-leverage columns (recommended if you tailor)
Resume VersionCover Letter?(Yes/No)Priority(A/B/C)Salary Range(or target)Interview DateOutcome Date
C) Calculated columns (Excel will fill these)
Days Since AppliedDays Since Last ContactNeeds Follow-Up?(YES/blank)Stale Application?(optional)
Why these columns work: they match how job searches actually fail:
- forgetting follow-ups
- losing job links
- not remembering which resume you used
- not having a “next action”
Step 3: Turn your tracker into an Excel Table (non-negotiable)
This is the #1 difference between a “pretty spreadsheet” and a tracker you can use for months.
- Click any cell in your header row
- Press Ctrl + T (Windows) / Cmd + T (Mac)
- Check My table has headers
- Go to Table Design → Table Name and name it:
Applications
Why Tables matter:
- formulas auto-fill down
- formatting auto-expands
- PivotTables update more reliably
- structured references make formulas readable
Microsoft reference: Structured references in tables
https://support.microsoft.com/en-us/office/using-structured-references-with-excel-tables-f5ed2452-2337-4f71-bed3-c8ae6d2b276e
Step 4: Create drop-downs (Data Validation) for Status, Source, Work Mode, Priority
4A) Build your lists
In Lists, set up four columns:
A1: StatusList
- Applied
- Interview
- Rejected
- Offer
- Accepted
- No Response
B1: WorkModeList
- Remote
- Hybrid
- On-site
C1: PriorityList
- A
- B
- C
D1: SourceList
- Company site
- Referral
- Recruiter
- Job board (other)
- Networking
- Other
4B) Apply drop-downs with Data Validation
- Select the Status column cells in your table
- Go to Data → Data Validation
- Allow: List
- Source: select the StatusList range on the Lists sheet
Repeat for Work Mode, Priority, and Source.
Microsoft reference: Apply data validation to cells
https://support.microsoft.com/en-us/office/apply-data-validation-to-cells-29fecbcc-d1b9-42c1-9d76-eff3ce5f7249
Pro tip: Keep Status broad (Applied/Interview/etc.) and put details (e.g., “Interview 2,” “Hiring manager screen”) in Notes. This keeps reporting clean.
Step 5: Add formulas that make your tracker actionable (not just a log)
Add these formulas to your calculated columns.
5A) Days Since Applied
In Days Since Applied: